
From Screen Recording to Published Video in 15 Minutes: A Step-by-Step Workflow
What if you could create videos as fast as you record them? Turn any screen recording into a polished, publish-ready video in under 15 minutes, without heavy editing.
TL;DR
Most video workflows are slow because they rely on manual editing.
The fastest teams use a video creation workflow. This lets you go from screen recording to a polished, publish-ready video in under 15 minutes.
The real advantage isn’t speed. It’s building a repeatable system that scales across training, demos, and support.
Most screen recorded video workflows are still stuck in the past.
You hit “record,” capture your screen, and then… the real work begins. Trimming clips. Fixing mistakes. Adding captions. Cleaning audio. Re-recording sections you messed up. Exporting. Uploading. Tweaking again.
What should’ve been a quick task quietly turns into a few hour production cycle.
The irony? Screen recording itself has never been easier. Every modern screen recording software can capture your screen in high-quality in seconds. So, recording isn’t the bottleneck anymore. Turning that recording into a polished, publish-ready video is.
Today the fastest teams don’t rely on heavy editing. They use streamlined, repeatable video creation workflows built for speed and automation.
Which means you can go from screen recording to publish video using workflow automation. In this blog, we’ll break down exactly how to create videos in under 15 minutes, step by step.
The Shift: From Video Editing Workflow → Video Creation Workflow
Most teams try to make editing faster. Better tools. Shortcuts. Templates. Maybe even outsourcing. But that’s the wrong place to optimize.
The real unlock isn’t improving your video editing workflow, it’s automating as much of it as possible. In 2026, high-velocity teams don’t treat video like a manual craft. They treat it like a system.
Instead of:
Record → Edit → Fix → Export → Re-edit
They run a streamlined video creation workflow:
Capture → Structure → Enhance → Publish
Capture: Record once, cleanly, with intent
Structure: Let AI or workflows auto-organize your content
Enhance: Auto-add captions, zooms, and cleanups
Publish: Export and share instantly, across channels
This shift changes everything. You’re no longer stuck trimming timelines or re-recording mistakes. You’re building a repeatable workflow automation process that turns raw screen recordings into polished videos quickly.
And that’s how you go from “editing videos” to actually creating videos at scale.
Get Started with Clueso
Upgrade your video creation workflow today.
Step-by-Step Workflow: From Screen Recording to Published Video
This is a repeatable video creation workflow you can use across use cases; whether you’re trying to create training videos, product walkthroughs, or quick internal demos. The goal is to create a workflow automation to go from screen recording → polished → publish video in minutes.
Let’s break down how to create videos in under 15 minutes:
Step 1: Capture Your Process on Clueso
Instead of overplanning your video, start by recording your screen on Clueso.
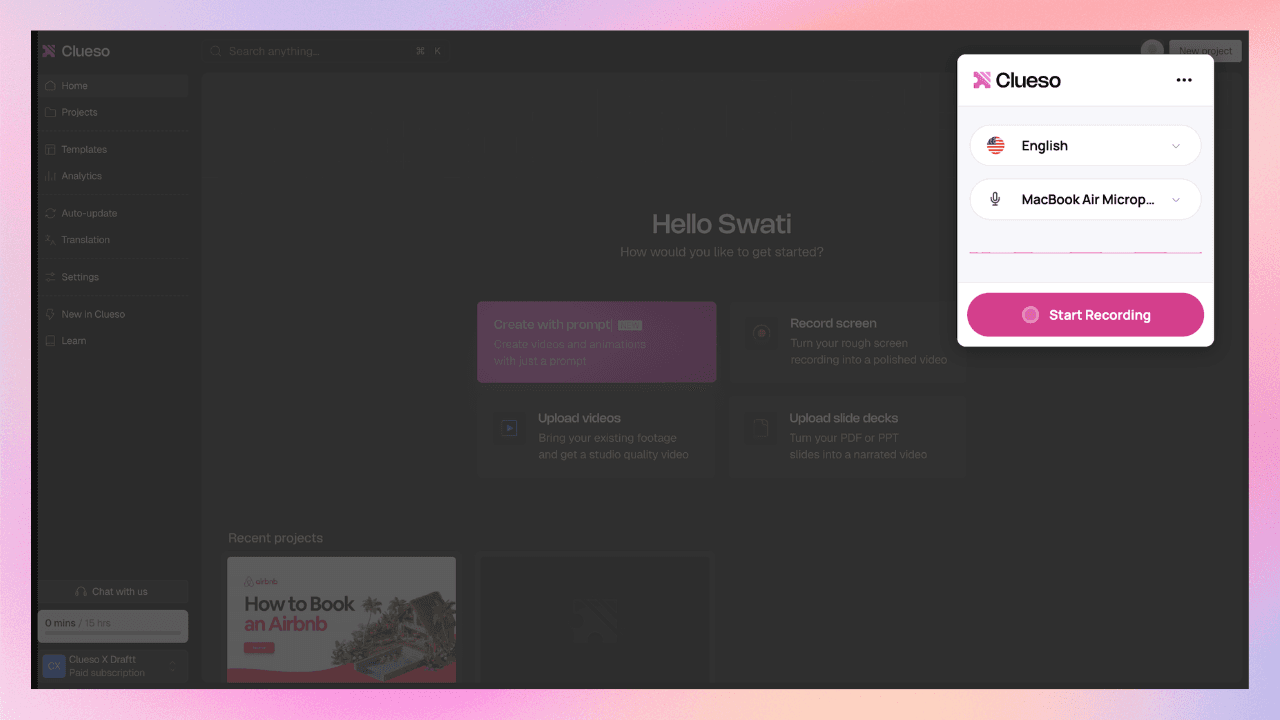
Walk through the process exactly as you would in real life. Click through your product, navigate flows, and explain things naturally as you go. You don’t need a script. You don’t need perfect delivery.
What matters is capturing:
The actual workflow
The sequence of actions
The context behind each step
You’re not trying to create a perfect video here. You’re capturing the raw process that Clueso will turn into a polished output later.
If something’s missing, You don’t have to start over. You can easily insert a new clip, add another recording, or drop in additional context exactly where it’s needed.
What makes this powerful on Clueso are the process capture and step detection feature. Behind the scenes, Clueso automatically detects logical steps in your workflow, segments your recording into clear sections, and removes pauses, filler words, and dead space. So instead of a long, messy recording, you get something that already resembles a clean product walkthrough.
Step 2: Generate & Edit Your Script
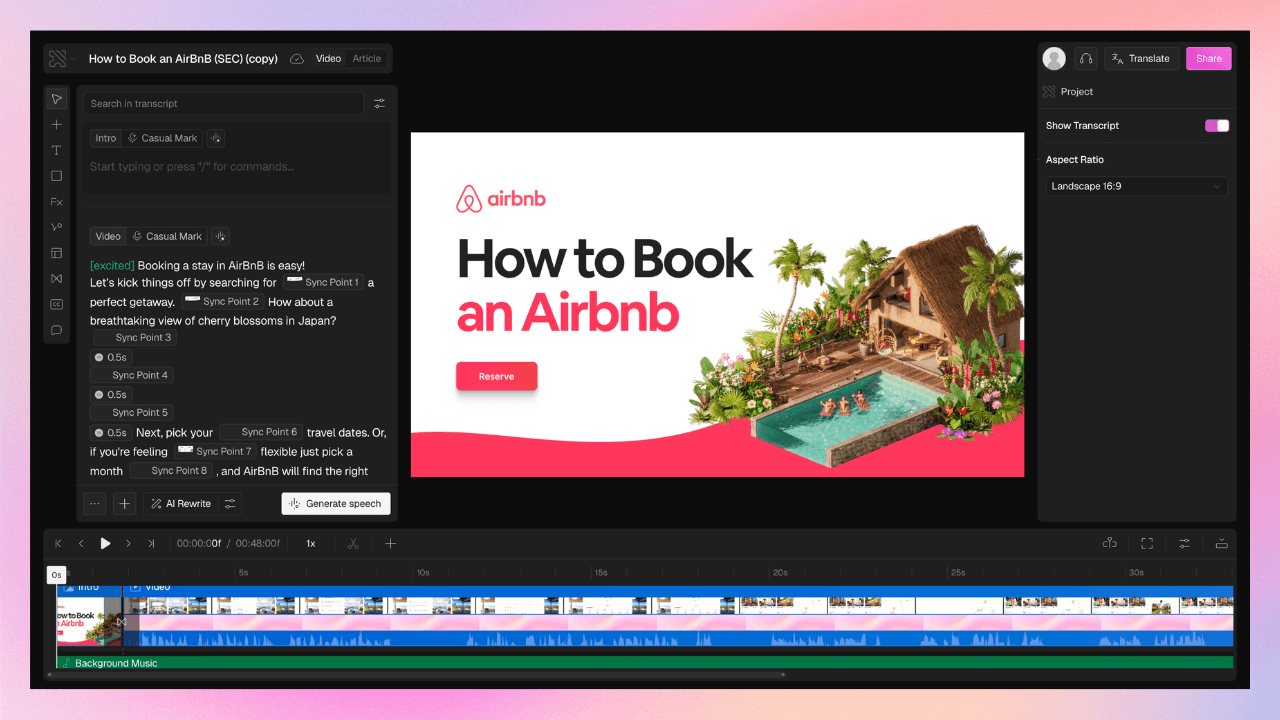
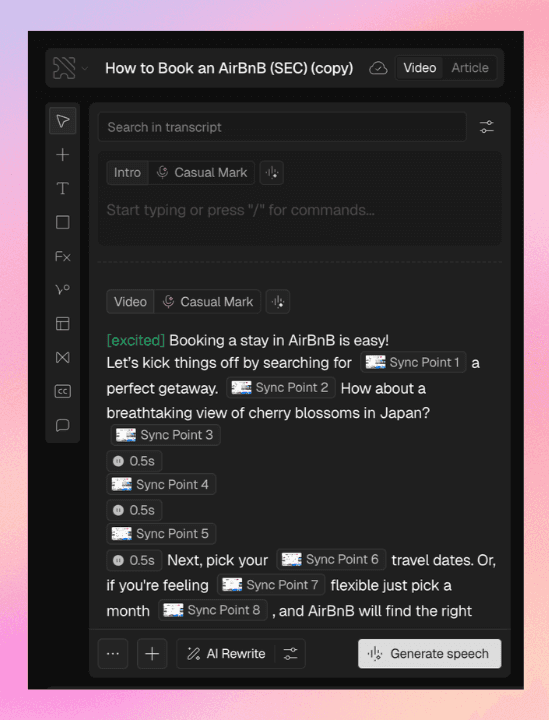
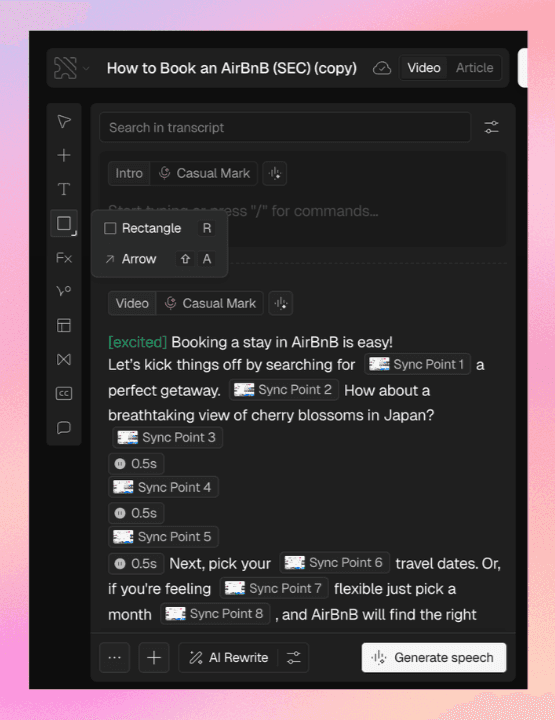
Clueso automatically generates a script from your screen recording. So you don’t need to worry about writing a script before recording.
Instead of a rough transcript, you get a clean, editable script layer. Clueso transcribes your narration, removes filler words, and turns it into clear, structured sentences. From here, editing is simple. You can edit the script to add missing context or adjust sequence as needed.
📌 Did you know?
You can add Transcription Keywords to control how specific words are captured, ensuring product names, jargon, and key terms are always transcribed accurately.

To refine your script for clarity, adjust writing style, tonality, or make it more conversational, you can use chat-based prompts.
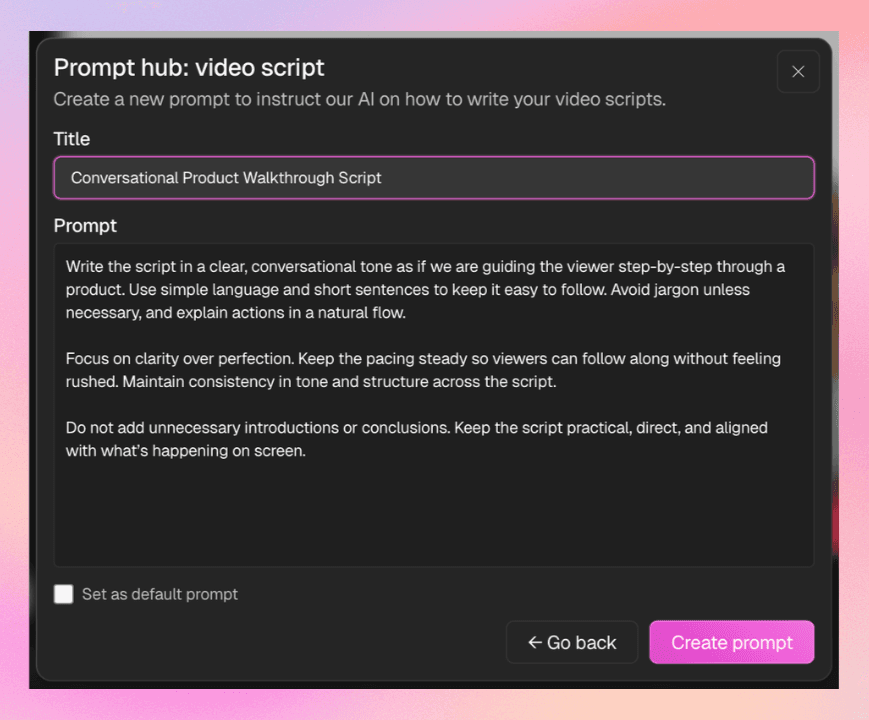
In fact, for teams or repeated use cases, Prompt Hub lets you:
Define tone and structure (e.g. onboarding, demo, training)
Reuse prompts across videos
Maintain consistency at scale
This feature lets you standardize tone and structure across all your scripts, so every video feels consistent without rewriting from scratch.
📌 Did you know?
Clueso automatically updates your voiceover while keeping it perfectly aligned with your visuals. It uses sync points, so what’s being said matches what’s being shown, frame by frame. The best part? These sync points are added for you. You can simply review and tweak them if needed, or adjust timing instantly without dealing with complex editing timelines.

Step 3: Generate AI Voiceovers
Once your script is ready, you can replace your raw narration with expressive AI voiceovers.
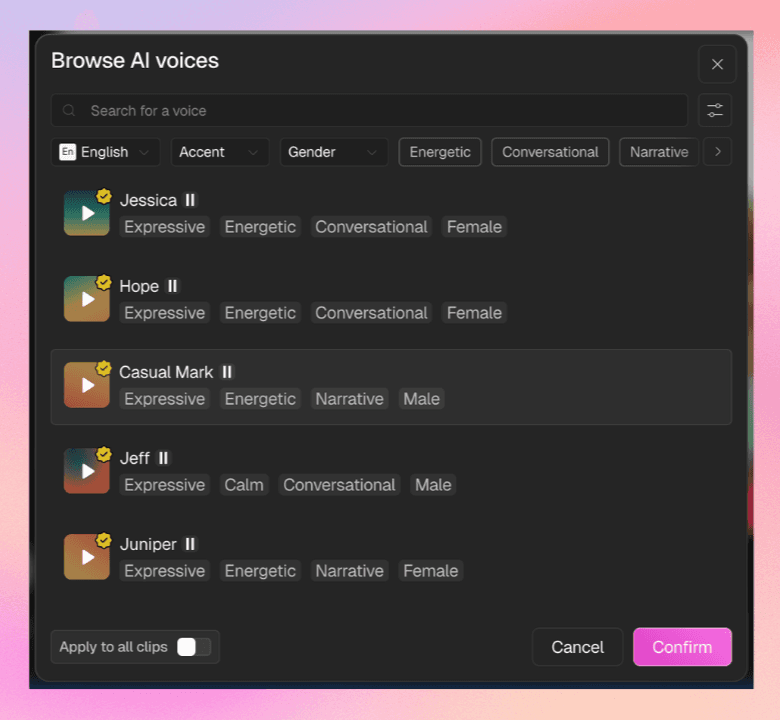
Clueso converts your script into a natural-sounding voiceover in one click.
You can choose from different voices, accents, and tones, and even switch voices for different sections of the video.
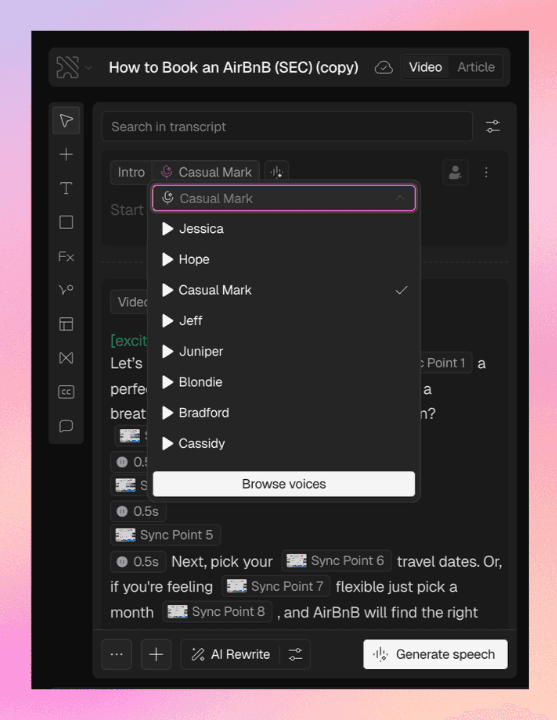
The generated narration stays perfectly synced with your visuals, so there’s no manual alignment needed.
What makes this powerful is the level of control you have. You can adjust the pace of the voice, add pauses for better timing, and fine-tune how the narration flows. It is especially useful for walkthroughs where viewers need time to follow along.
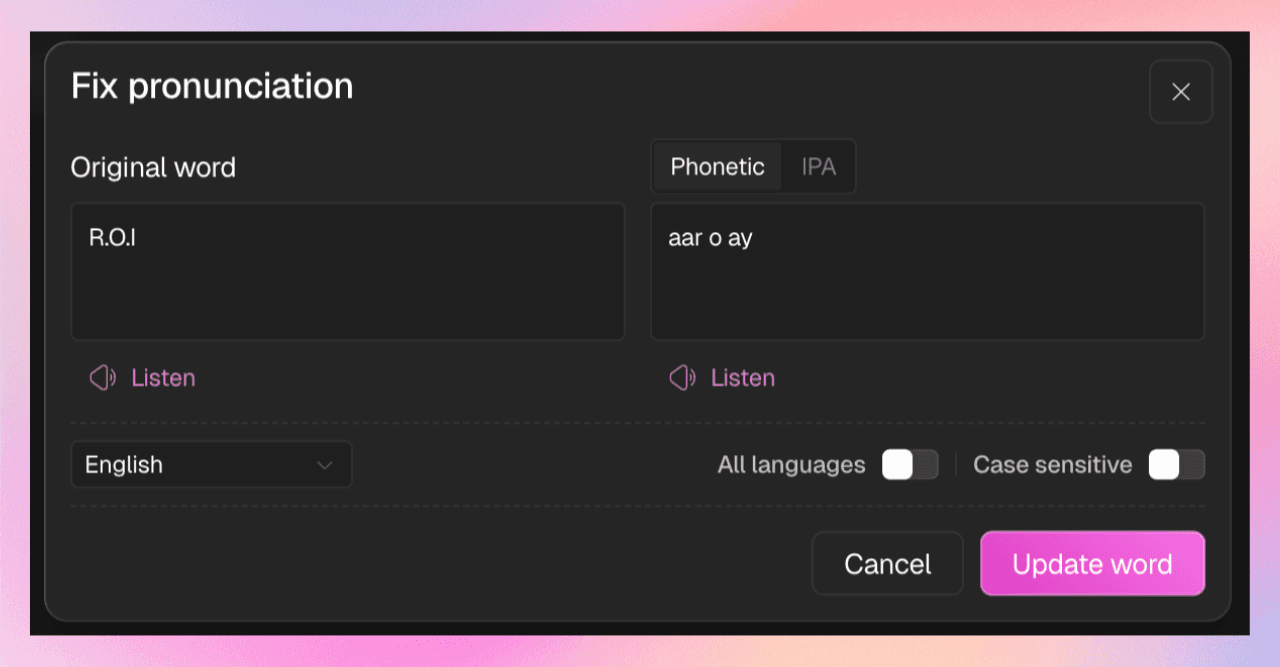
📌 Did you know?
With Clueso’s pronunciation dictionary, you can customise how specific words, like product names, acronyms, or industry jargon, are spoken in your videos. Simply define the correct pronunciation once, and Clueso’s AI will apply it consistently across all your voiceovers.
If your original recording already sounds good, you also have the option to keep it or mix it with AI voiceovers. It gives you the flexibility instead of forcing a full replacement.
💡 Pro Tip: Use slight pauses and a slower pace for onboarding or training videos. It makes the experience feel more intentional and easier to follow.
Step 4: Enhance Visuals
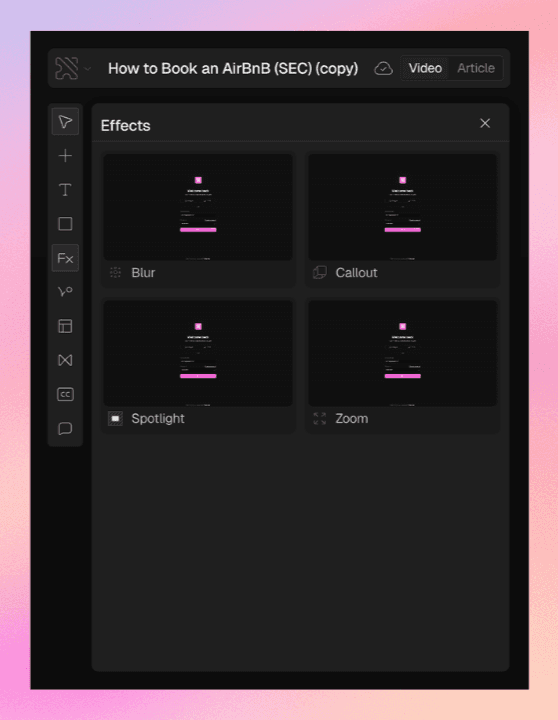
At this stage, your video already has structure and voice, but it still needs visual polish. This is where Clueso automatically upgrades your video to something that feels designed and engaging.
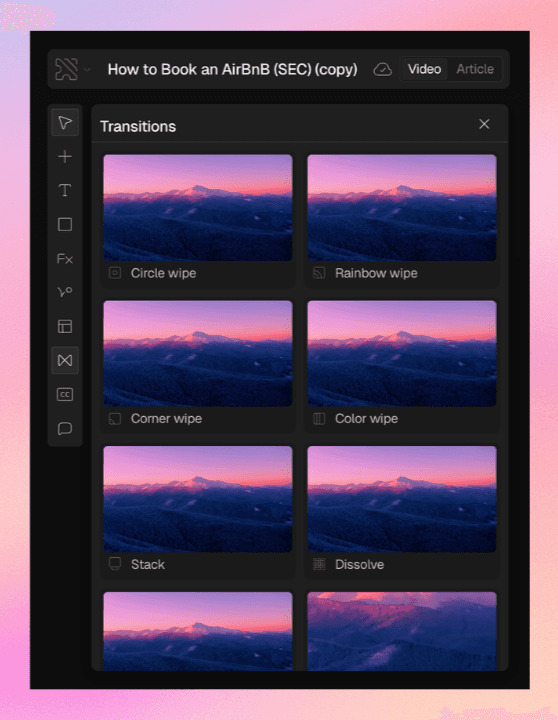
Instead of manually adding zooms, highlights, or transitions, Clueso applies smart visual effects automatically based on your workflow. It detects where actions happen and guides viewer attention with smart zoom, spotlight, and visual callouts so viewers always know what to look at, without you editing frame-by-frame.
You can still layer in additional context where needed, like blurring sensitive information or adding simple overlays. Clueso enables you to edit and control the visual cues for better clarity and precision.
📌 Did you know?
Clueso lets you enhance your videos with AI image generation and built-in motion graphics. You can instantly create custom visuals to explain concepts, fill gaps, or make content more engaging, while motion graphics like animations, transitions, and dynamic elements help bring your videos to life. The result is richer, more polished content that keeps viewers engaged.
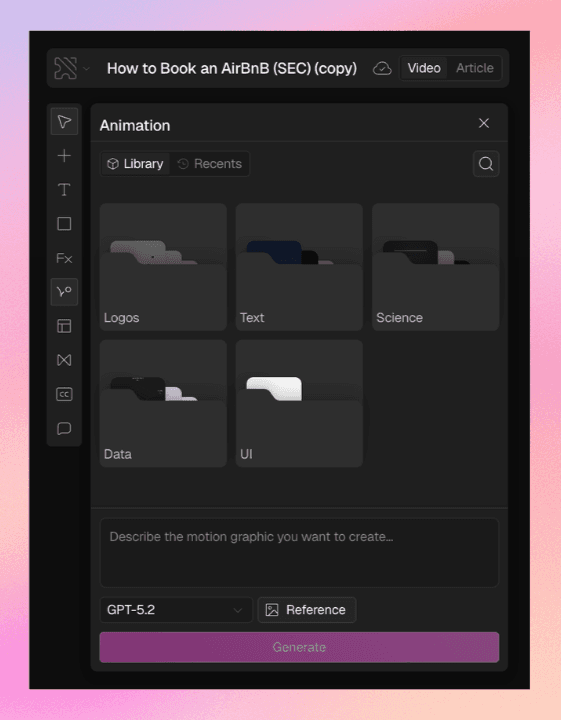
Clueso also lets you add AI avatars directly onto your videos, giving them a more human, presenter-led feel. These avatars can be placed within your video and will lip-sync with your voiceover, making your content more engaging without needing to be on camera.
💡 Pro Tip: Let Clueso handle most of the visual effects automatically, and only step in when you need to add clarity or emphasis. Over-editing can make the video feel busy.
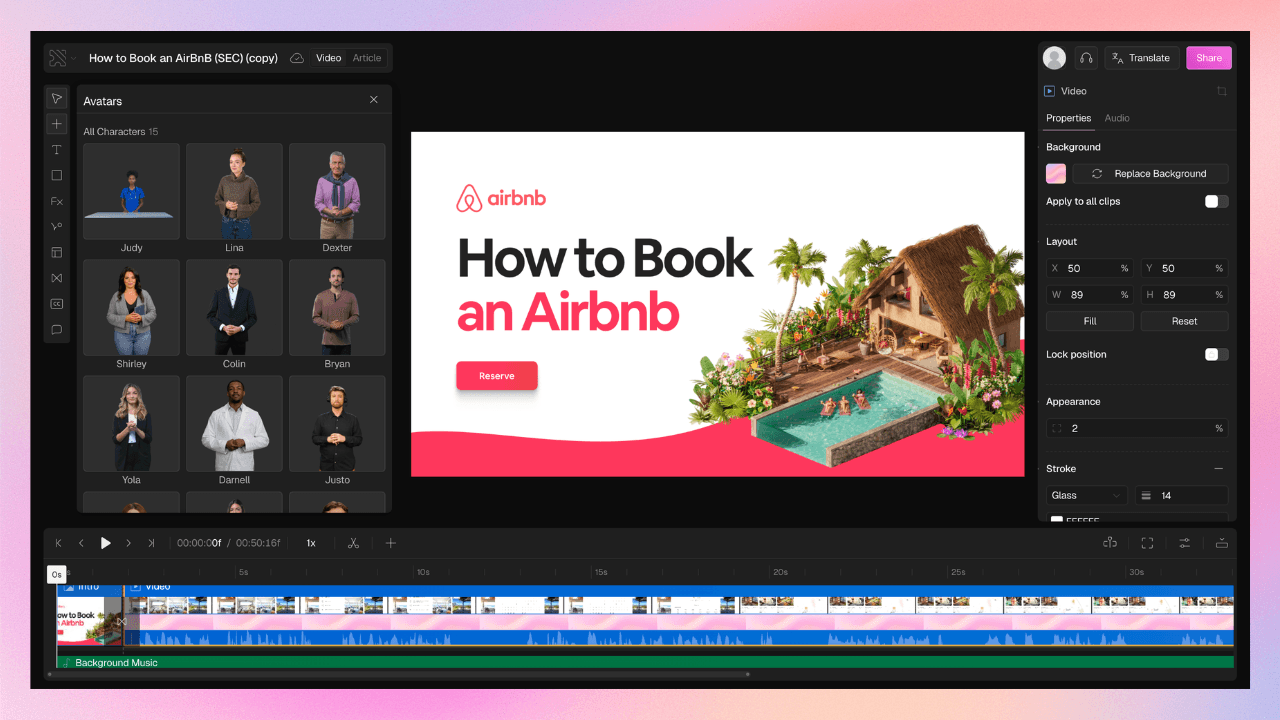
Step 6: Add Branding
Once your video is visually ready, the next step is making it feel consistent and on-brand.
On Clueso, you don’t need to style each video manually. Instead, you drop in your fonts, colors, and logos once and that branding automatically carries across all your videos. This is especially useful when you’re creating multiple videos across use cases, because everything looks cohesive without extra effort.
💡 Pro Tip: Set up your branding before you start creating multiple videos. That way, every new video is automatically aligned without needing retroactive fixes.
Step 7: Add Subtitles, Translations & Accessibility
Clueso can help you make your videos accessible and global.
Clueso automatically generates captions from your script, so your video is instantly easier to follow, even without sound. These captions are designed to be clean and readable, helping viewers stay engaged throughout.
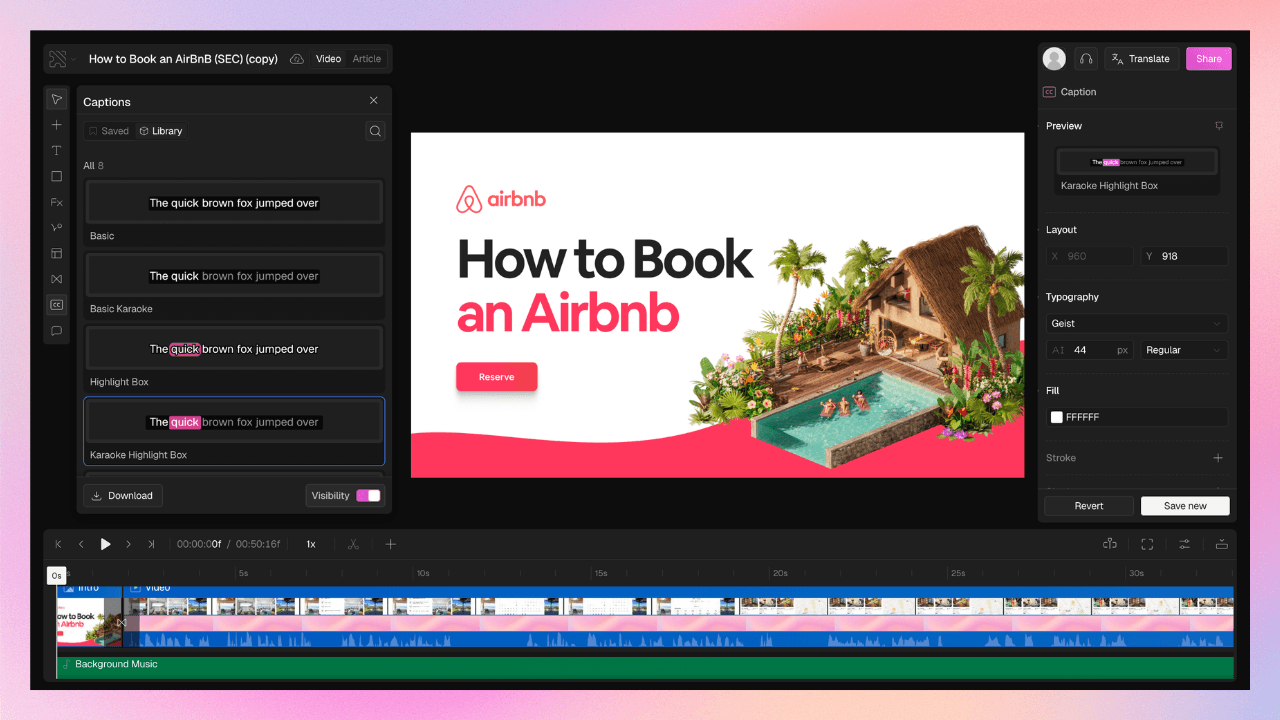
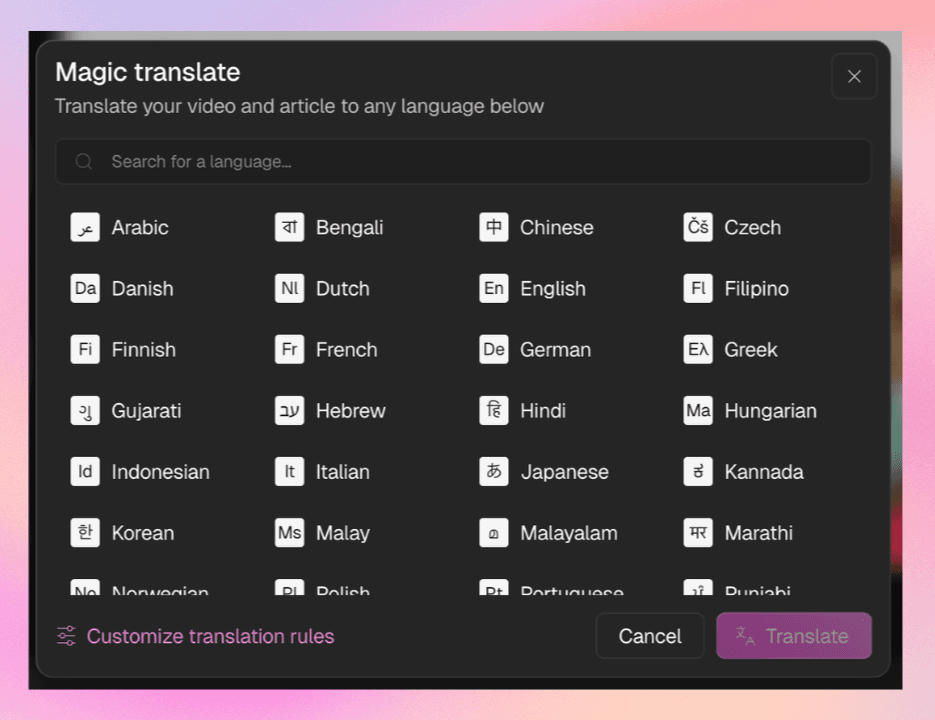
You can also translate your video in one click, including voiceover, captions, and even documentation, into multiple languages. This makes it easy to reuse the same video across regions.
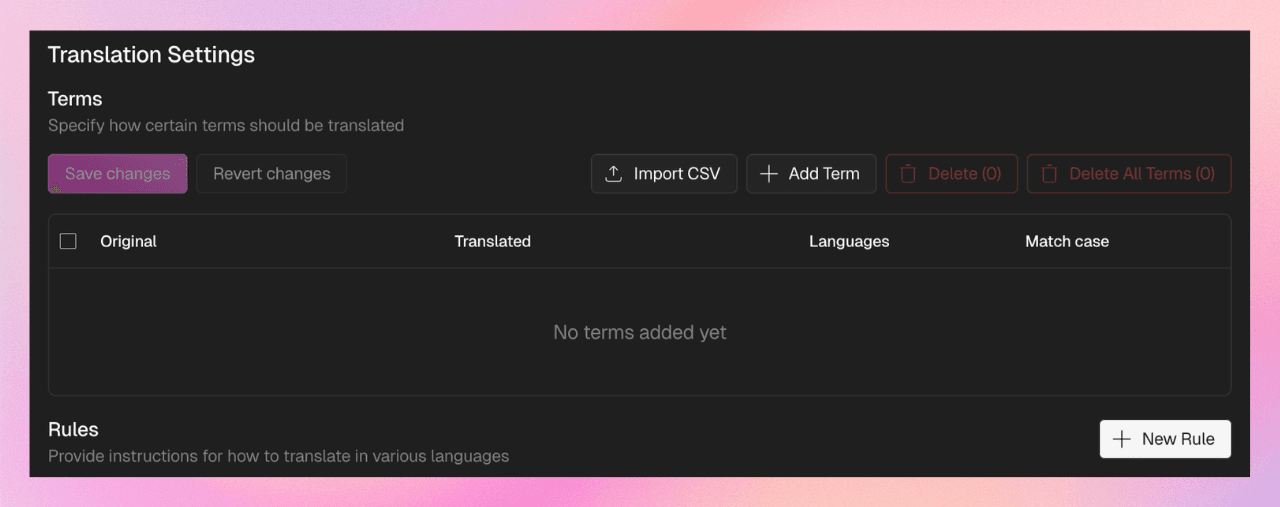
To keep things accurate, Clueso gives you a translation glossary, where you can define how specific terms (like product names or brand phrases) should be translated or not translated at all. This ensures consistency across all your videos at scale.
📌 Did you know?
With Clueso’s translation glossary and rules, you can control exactly how your content is translated. Define it once and Clueso ensures every translated video follows the same guidelines automatically. Clueso flags translations that diverge from your glossary so you can fix them before publishing.
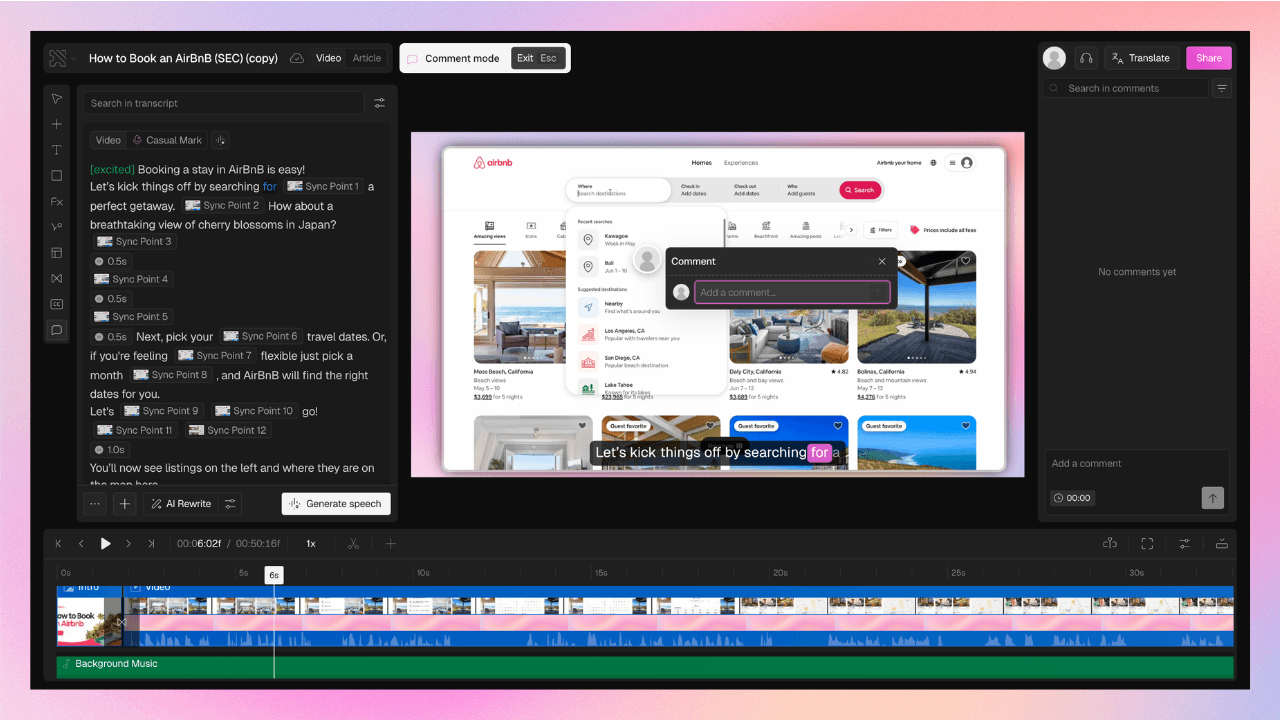
Step 8: Review, Sync & Collaborate
At this stage, your video is almost ready and it is time for the final review.
Clueso lets you review videos with comments directly inside the editor. You can leave feedback tied to specific moments in the video, so there’s no confusion about what needs to change.
Instead of long feedback threads or meetings:
Comments are attached to exact timestamps
You can highlight areas on screen for clarity
Feedback stays contextual and actionable
This step is about fine-tuning and alignment, making sure everything flows perfectly before publishing.
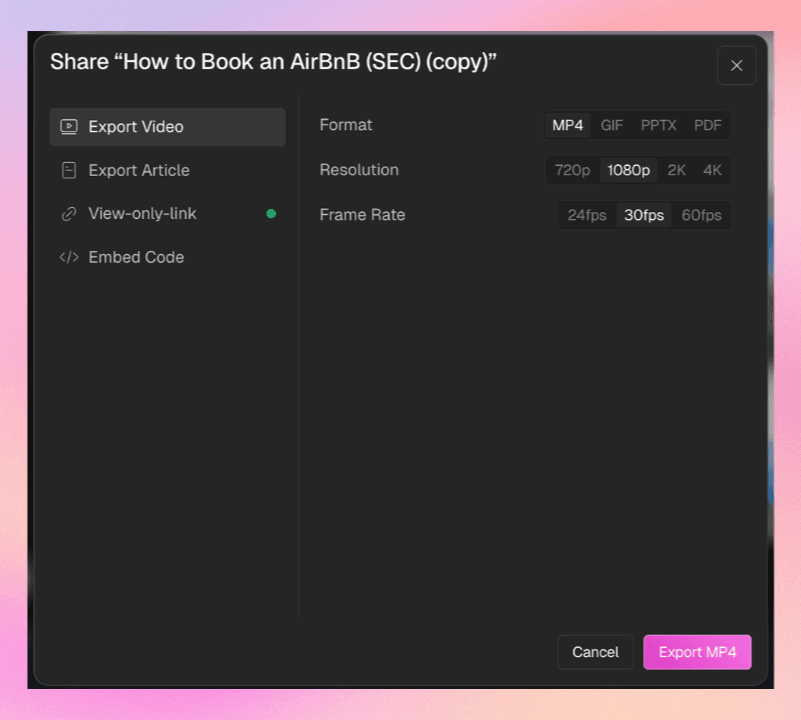
Step 9: Publish & Share
Once your video is ready, publishing on Clueso is instant. You can generate a shareable link or directly embed your video anywhere, whether that’s your help center, product docs, LMS, or internal tools.
What makes this powerful is flexibility. Your video isn’t locked inside Clueso. You can:
Embed it in knowledge bases or onboarding flows
Share it with customers or teammates instantly
Export it as a file if needed
Clueso even supports a customizable embed player, so the video experience can match your brand and fit seamlessly into your product or documentation.
This is where everything comes together: your video goes from a creation asset to a scalable piece of content you can reuse across your entire product and customer experience.
Get Started with Clueso
Upgrade your video creation workflow today.
Real Example Scenarios
Now that we’ve broken down how to create videos, let’s talk about where to use them.
This kind of streamlined video creation workflow isn’t limited to one use case. In fact, its biggest advantage is versatility. You can apply the same system across teams, functions, and content types without reinventing the process every time.
Here’s where it works especially well:
1. Creating Training Videos for New Hires
Traditional onboarding is slow and often inconsistent. New hires are handed long documents, scattered resources, or shadowing sessions that depend on who’s available. The result? Repeated explanations and uneven training experiences.
With this workflow, you can create training videos by simply recording your process once. Over time, this builds a library of:
Standardized onboarding content
Role-specific walkthroughs
Step-by-step process videos
So instead of explaining the same thing 10 times, you explain it once and reuse it across every new hire.
2. Product Walkthroughs for Customers
Most product demos demand heavy manual effort. You run a live call, explain features, and then… it’s gone. If another customer asks the same question, you repeat the same walkthrough.
This workflow changes that. You can turn any demo or feature explanation into a reusable video by capturing it once and instantly structuring it into a clear product walkthrough video. These videos can then be used across:
Customer onboarding
Sales follow-ups
Marketing content
Feature announcements
Instead of creating content from scratch each time, you build a reusable video layer around your product.
3. Internal Process Documentation
Documenting processes is usually tedious. You either write long SOPs that no one reads, or rely on tribal knowledge that lives inside people’s heads.
With screen recording + automation, tutorial video creation becomes much simpler. Now you have a living, visual SOP that’s easier to follow than text.
This is especially useful for cross-functional teams, where processes need to be shared, repeated, and updated frequently.
4. Support & Help Center Videos
Support teams spend a huge amount of time answering the same questions. Instead of replying manually every time, you can record quick answers and turn them into short, structured videos.
These can then be:
Embedded in help centers
Shared directly in support responses
Linked in FAQs or documentation
Over time, this reduces ticket volume and speeds up resolution because users can see exactly what to do.
Get Started with Clueso
Upgrade your video creation workflow today.
Pre-Publish Review Checklist
Before you hit publish video, take 2–3 minutes to run through this quick check. It ensures your video is clear, usable, and ready for your viewers.
Clarity & Flow
Is the explanation easy to follow from start to finish?
Are there any confusing steps or jumps in the process?
Structure
Are steps logically ordered?
Does the video have a clear beginning, middle, and end?
Script & Captions
Are captions accurate and free of filler words?
Is the narration concise and easy to understand?
Audio Quality
Is the voice clear and consistent (no noise or awkward pauses)?
If using AI voiceover, does it sound natural?
Visual Quality
Are zooms, highlights, and cursor movements aligned with the narration?
Is everything on screen readable?
Branding & Context
Are logo, colors, and styling consistent?
Are titles or annotations added where needed?
Title & SEO
Does the video title clearly describe what it covers?
Are relevant keywords included (for search and discoverability)?
Accessibility
Are subtitles enabled?
Is the video understandable without sound?
If all of this checks out, you’re good to go. No overthinking or endless revisions needed. Just a fast, reliable path from screen recording to publish-ready video.
Tools to Create Published Videos
Not all tools are built for the same kind of workflow. Some help you record. Some help you edit. Others help you publish. But very few connect all of these into a single, efficient system.
Here’s a simple comparison of how different categories of tools stack up when it comes to creating and publishing videos:
Feature | Clueso | Traditional Documentation Tools | Screen Recording Software | Knowledge Bases |
|---|---|---|---|---|
Workflow Type | Capture → Generate → Refine | Write → Screenshot → Format | Record → Edit | Write → Organize |
Automation Level | ✓ High (end-to-end automation) | ✗ Manual | ✗ Manual | ✗ Manual |
Creation Speed | Minutes (under 15 mins) | Hours (4–8 hrs per guide) | 1–3 hours (plus writing later) | 2–6 hours |
Starting Point | Screen recording | Blank document | Screen recording | Blank document |
Writing Effort | Minimal (AI-generated) | Fully manual | Not applicable | Fully manual |
Screenshot Handling | ✓ Auto-captured & annotated | Manual capture & editing | Limited/manual | Manual |
Output Format | ✓ Video + Step-by-step guides | Text + images | Video only | Text-heavy docs |
Consistency | ✓ Standardized across content | Varies by writer | Varies | Template-dependent |
Scalability | ✓ High (repeatable workflow) | Low | Medium | Medium |
Localization | ✓ Auto-translation (multi-language) | Manual | ✗ Not supported | Limited |
Branding | ✓ Auto-applied | Manual formatting | Limited | Template-based |
Best For | End-to-end video + documentation workflow | Detailed manuals | Demos, walkthroughs | Knowledge storage |
What This Means in Practice
Most teams today are still stitching together multiple tools: one for screen recording, another for editing, and yet another for hosting or documentation
That’s where time gets lost. Clueso combines recording, enhancement, and publishing into one continuous video creation workflow. If your goal is speed, consistency, and the ability to publish video at scale, end-to-end workflows remove the most friction.
The Real Win Is Repeatability
Getting a video out in 15 minutes is impressive. But that’s not the real win.
The real advantage is being able to do it again tomorrow. And the day after. And across your entire team without slowing down or reinventing the process every time. That’s the shift from traditional video editing workflows to modern video creation workflows.
You’re no longer treating each video like a one-off project that needs effort, coordination, and time. Instead, you’re building a system that captures, structures, enhances, and helps you publish video content with minimal friction.
And that’s what actually scales:
Creating training videos without repeating yourself
Turning everyday workflows into reusable content
Publishing consistently without bottlenecks
Because in the long run, speed helps you once. Repeatability helps you every time.
So instead of chasing faster edits, adopt a system that removes friction from creating and publishing videos altogether.
Frequently Asked Questions About Video Creation Workflow
1. How can I speed up my video editing workflow?
You can only speed up your video editing workflow by cutting down the amount of editing you need. Use a tool like Clueso that helps you record in a clear flow, uses text-based editing, and automates captions, zooms, and voiceovers.
2. What is the difference between a video editing workflow and a video creation workflow?
Video editing workflow = Record → manually cut, trim, fix, enhance → export
Video creation workflow = Capture → auto-structure → auto-enhance → publish
One is manual and slow while the other is automated and repeatable.
3. What are the biggest mistakes in video creation workflows?
The biggest mistakes in video creation workflows are:
Over-relying on editing instead of fixing the workflow
Starting from a blank script or doc instead of recording first
Treating every video as a one-off project
Using too many disconnected tools (record → edit → upload separately)
Aiming for perfection → leading to retakes and delays

Co-founder & CBO
Neel is the co-founder at Clueso and handles all things GTM, from marketing to sales to customer success. A Y Combinator W23 alum and IIT Madras graduate, Neel embraced entrepreneurship as an early-career choice. Drawing on his experience building Clueso, he shares advice on building products people want and nurturing strong customer relationships.
